4 Pixel photography tips I used to capture Yosemite's Firefall
When I originally planned a February trip to Yosemite National Park, I hadn’t thought much about the timing. I figured the park would be less crowded, and I could put my crampons to use while trekking up icy trails. What I didn’t realize is that I’d scheduled myself to go during what is one of the park’s most photographed events: Firefall.
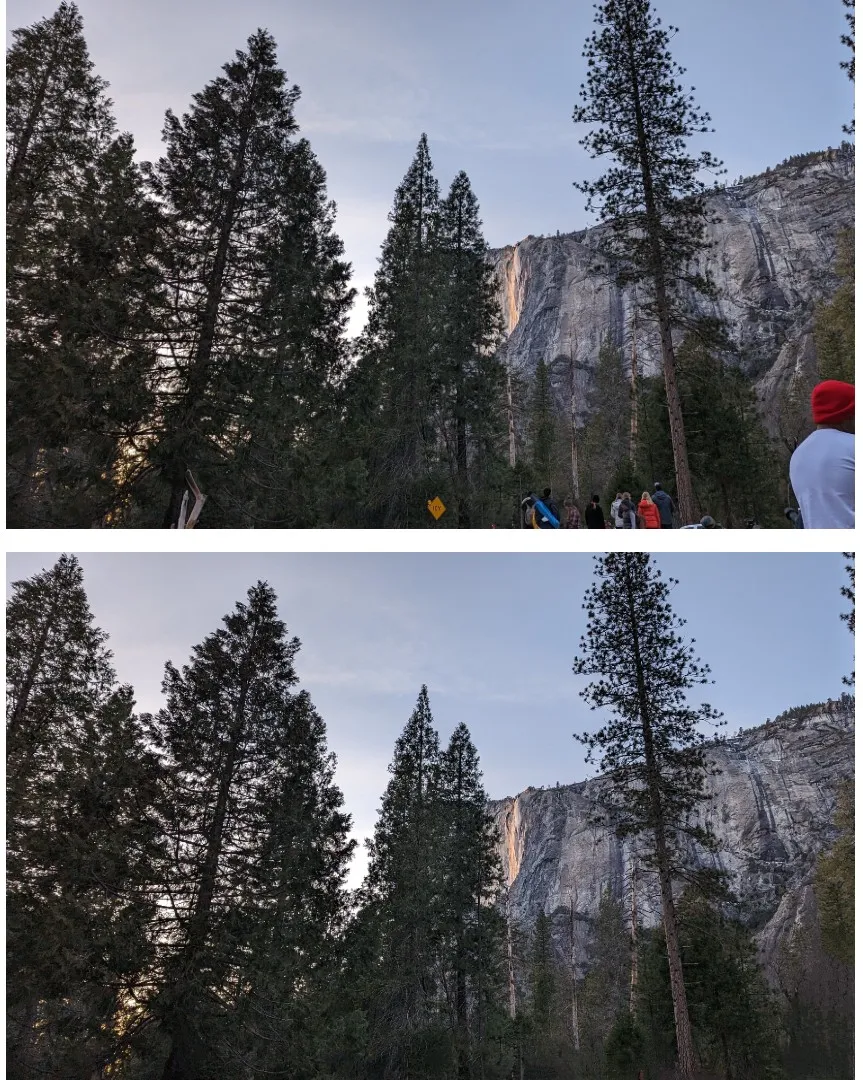
During the end of February when the sun sets in Yosemite, it perfectly hits Horsetail Falls to create a reddish-orange glow. Depending on various weather conditions, the waterfall can look like a lava flow. It’s incredible — which is why it’s a hugely photographed and visited moment. Crowds flood the park during these weekends and swarm the viewing areas in the hours leading up to Firefall, which lasts for a precious few minutes each evening. To say I was intimidated to photograph Firefall would be an understatement. For some tips, I reached out to the Pixel camera team’s Andy Radin, a pro photographer and image quality expert.
Armed with my Pixel 7 Pro, an optimistic spirit and some sage words of advice and encouragement from Andy, I headed for Firefall! Here are my favorite photos I took along with the tips that helped me take (and in some cases, edit) them.
1. Get around crowds with Super Res Zoom
Since this trip was primarily to hike and going during Firefall was just a happy accident, I didn’t want to spend all day sitting in the viewing areas waiting for dusk — but a lot of other people did. And by a lot, I mean thousands. Because I opted to show up later the two times I ventured to the waterfall, I didn’t get the closest spots, and there were crowds in front of me.
I settled on 5x-10x zoom to get beyond the crowds and see more of the mountain’s detail.

To get my shots, I relied on Pixel 7 Pro’s Super Res Zoom, which can shoot up to 30x 1 . The sweet spot for my position turned out to be 5x to 10x. The auto-5x button, which you’ll see immediately on the screen when you open the Camera app, made for quick use. And Andy noted that the 10x option has a slightly heavier haptic “tick” that makes it easy to feel without looking; you just long-press the zoom toggle on screen and slide to the left. I was immediately able to feel the heavier vibration so I could just focus on the shot.
2. Focus on the subject with Magic Eraser
I mostly relied on Super Res Zoom, but also zoomed out for some variety; those zoomed-out photos had lots of people in them (and cars, and chairs, and cameras — the list goes on). A quick little tap here and a swipe there and all the extra distractions in the photos disappeared, thanks to Magic Eraser 2 .
Magic Eraser helped me make use of photos I took without using my zoom, like this landscape shot.
Magic Eraser uses machine learning to identify and remove these unwanted items and “patch” the areas to match what would have been in that spot.
3. Adjust for changing brightness and hue
“Successful shots of Firefall are often a little underexposed, which lets the contrast between the dark rock and the sunlit water really shine,” Andy told me. His advice: While using the camera, tap the screen to bring up manual adjustments, and then play with pulling down the Shadow and Brightness sliders to prevent the glowing water from being blown out. He also recommended trying out the White Balance Slider to avoid accidentally neutralizing Firefall’s warm sunset shades.
Using the Shadow and Brightness sliders helped me adjust to how Firefall’s colors changed from Friday (left) to Sunday.
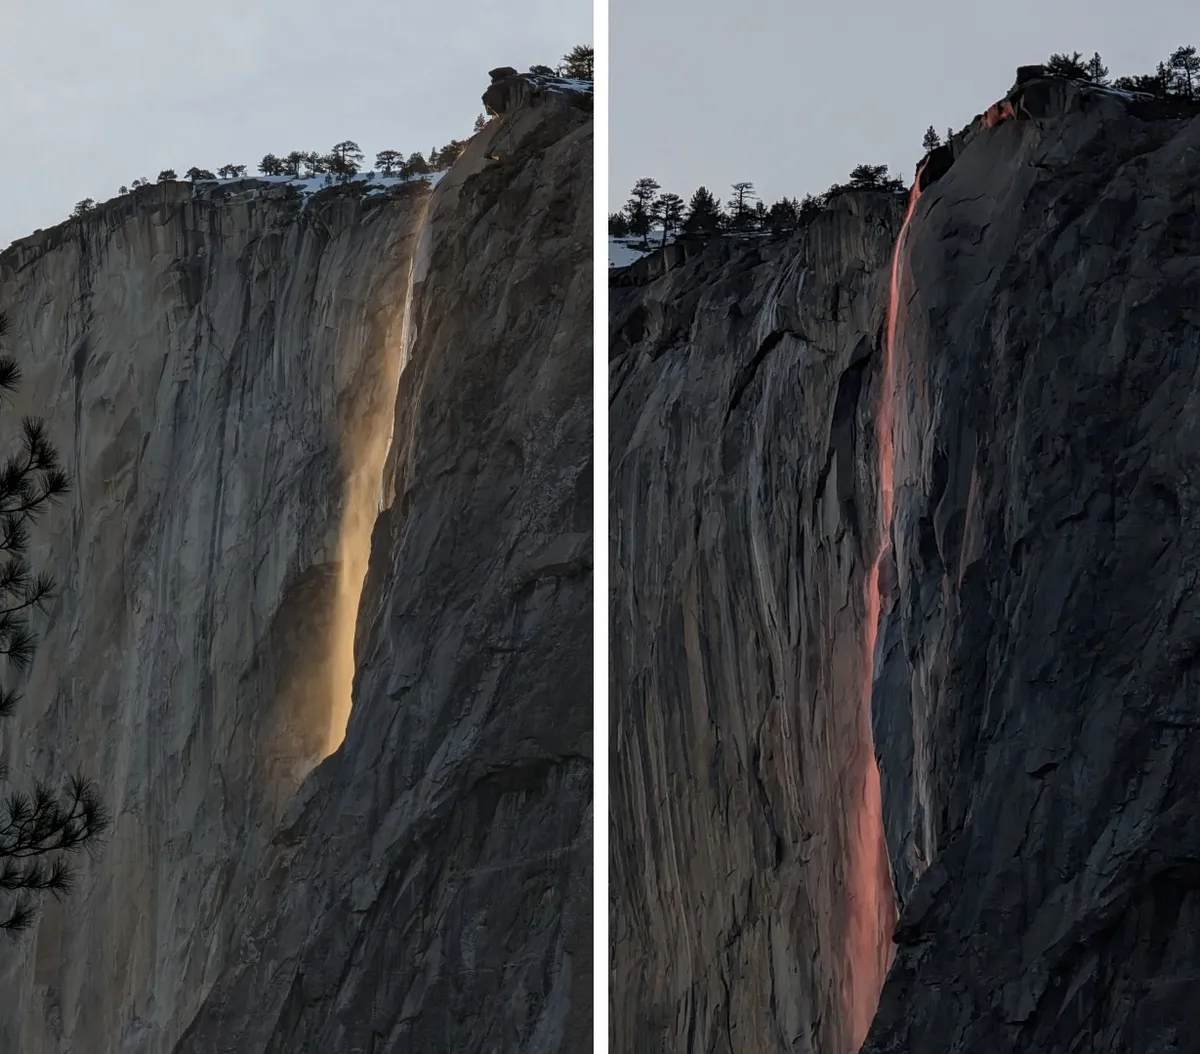
Trying to photograph Firefall on two different evenings showed me how useful the manual adjustments are: Friday night, it glowed yellow and slightly orange, while on Sunday, it was red and even purple. I was able to adjust my settings to better capture each.
4. Capture moving water with Motion Mode’s Long Exposure
Pixel’s Long Exposure mode shows the action of what was moving while everything else is crisp, like fast-flowing waterfalls (perfect!), but on traditional cameras it requires a tripod. While I brought a small tripod with me, I didn’t bring it with me on any hikes — which ended up being OK. “Our engineers and scientists went to extraordinary lengths to stabilize Motion Mode shots for you without needing a tripod, which is really exceptional for long-exposure photos,” Andy explained. That meant I was able to capture detailed shots despite fast-changing lighting or flowing water.
I used Motion Mode’s Long Exposure setting to capture the top of Yosemite Falls.

After choosing “Motion” from the options on the camera screen, I just clicked “Long Exposure” and then held still — or as still as possible without my tripod.


