How to get started with Pixel 8 Pro Camera’s Pro Controls

General summary
Learn how to use the Pixel 8 Pro's Pro Controls to take your photography skills to the next level. Get familiar with focus control, shutter speed, and ISO to fine-tune your photos. Experiment with RAW files for more editing flexibility and opt for full resolution for sharp, detailed images. Choose the lens you want to use for specific effects, and enjoy the creative freedom of a professional camera right on your phone.
Summaries were generated by Google AI. Generative AI is experimental.Bullet points
- Pixel 8 Pro’s Pro Controls give you more control over camera settings for fine-tuning photos.
- Focus control, shutter speed, and ISO are key settings to start with.
- RAW format offers more flexibility for photo editing compared to JPEG.
- Full resolution (50 megapixels) preserves details for cropping, zooming, and large prints.
- Choose specific camera lenses (ultrawide, wide, telephoto) for desired effects.
Haiku-ish
Pixel 8 Pro's Pro Controls
Focus, shutter speed, ISO
Adjust for your shot
RAW files for editing
More data, more flexibility
Edit with ease
Full resolution
For cropping, zooming, printing
Capture every detail
Explore other styles:
The Pixel Camera is capable of a lot: From Super Res Zoom to astrophotography to editing tools like Magic Eraser, there’s so much you can do with just a few taps and swipes. But while you can definitely rely on the smarts and software inside Pixel to get incredible photos, you also have the option to use Pixel 8 Pro’s Pro Controls, which give you more control of the camera’s settings so you can fine tune how your photos will look.
Of course, if you’ve never used a professional camera, seeing all the manual options you have on the Pixel 8 Pro might be overwhelming — so to help, we asked Pixel Camera product manager Alex King for his top tips on getting started with Pro Controls in Pixel 8 Pro.
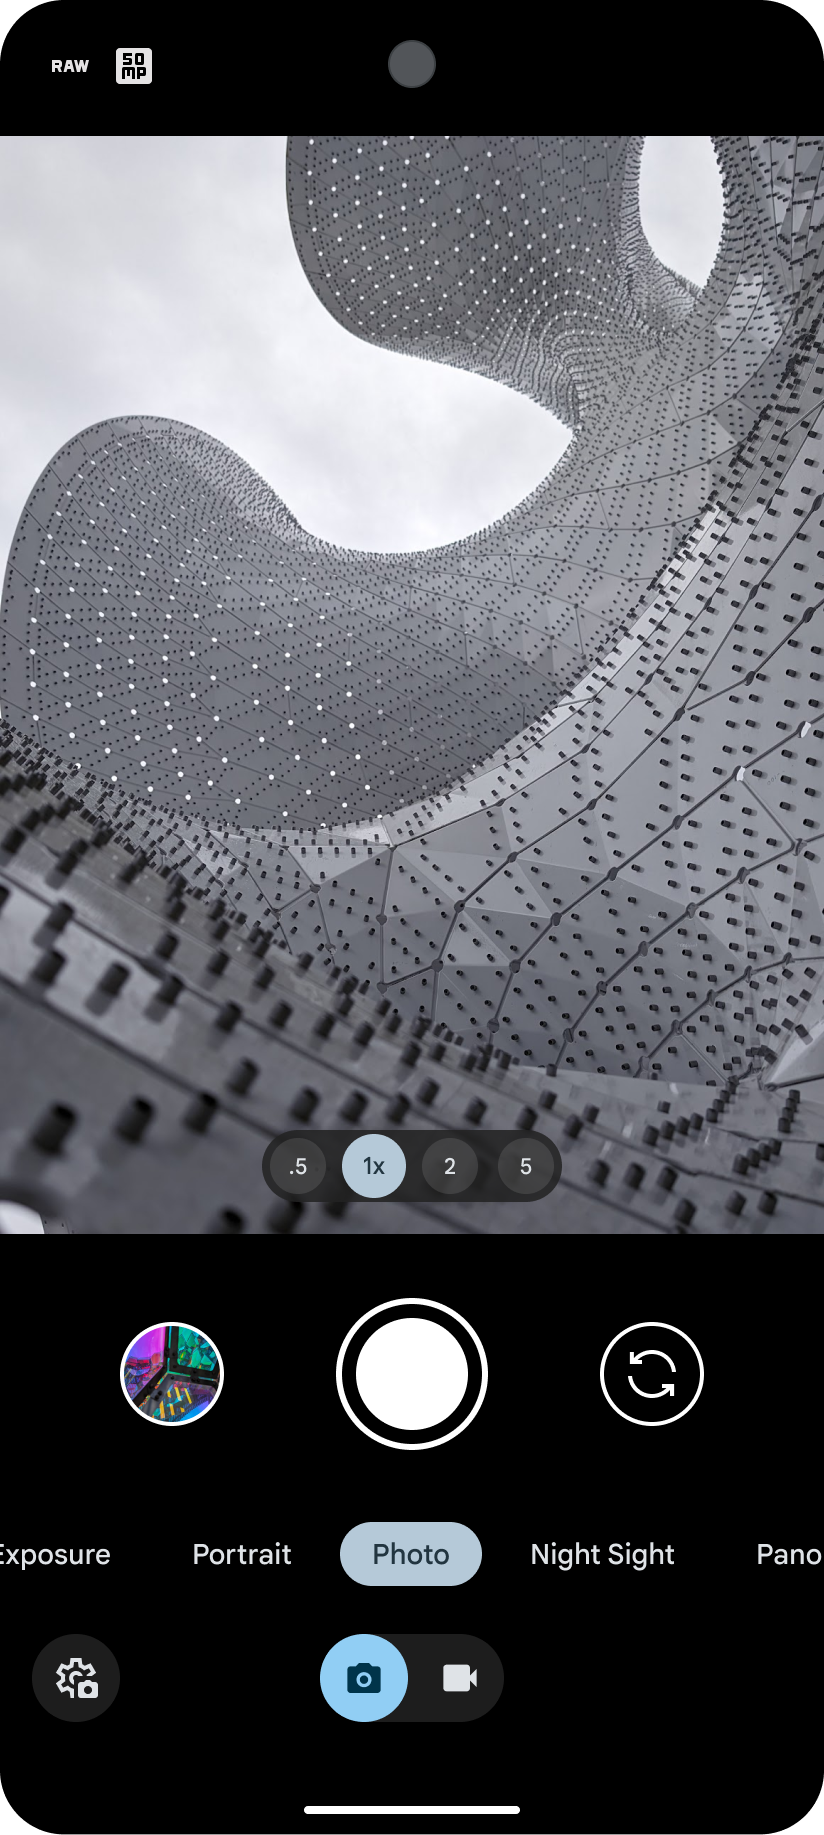
You can access Pro Settings (50MP, RAW, Manual Lens selection) by tapping the Settings icon in the lower left hand corner and then going to the Pro tab.
You can access Pro Controls (Focus, Shutter Speed, and ISO) by tapping the Controls icon in the lower right hand corner. This will show Pro Controls and more at the bottom of the screen.
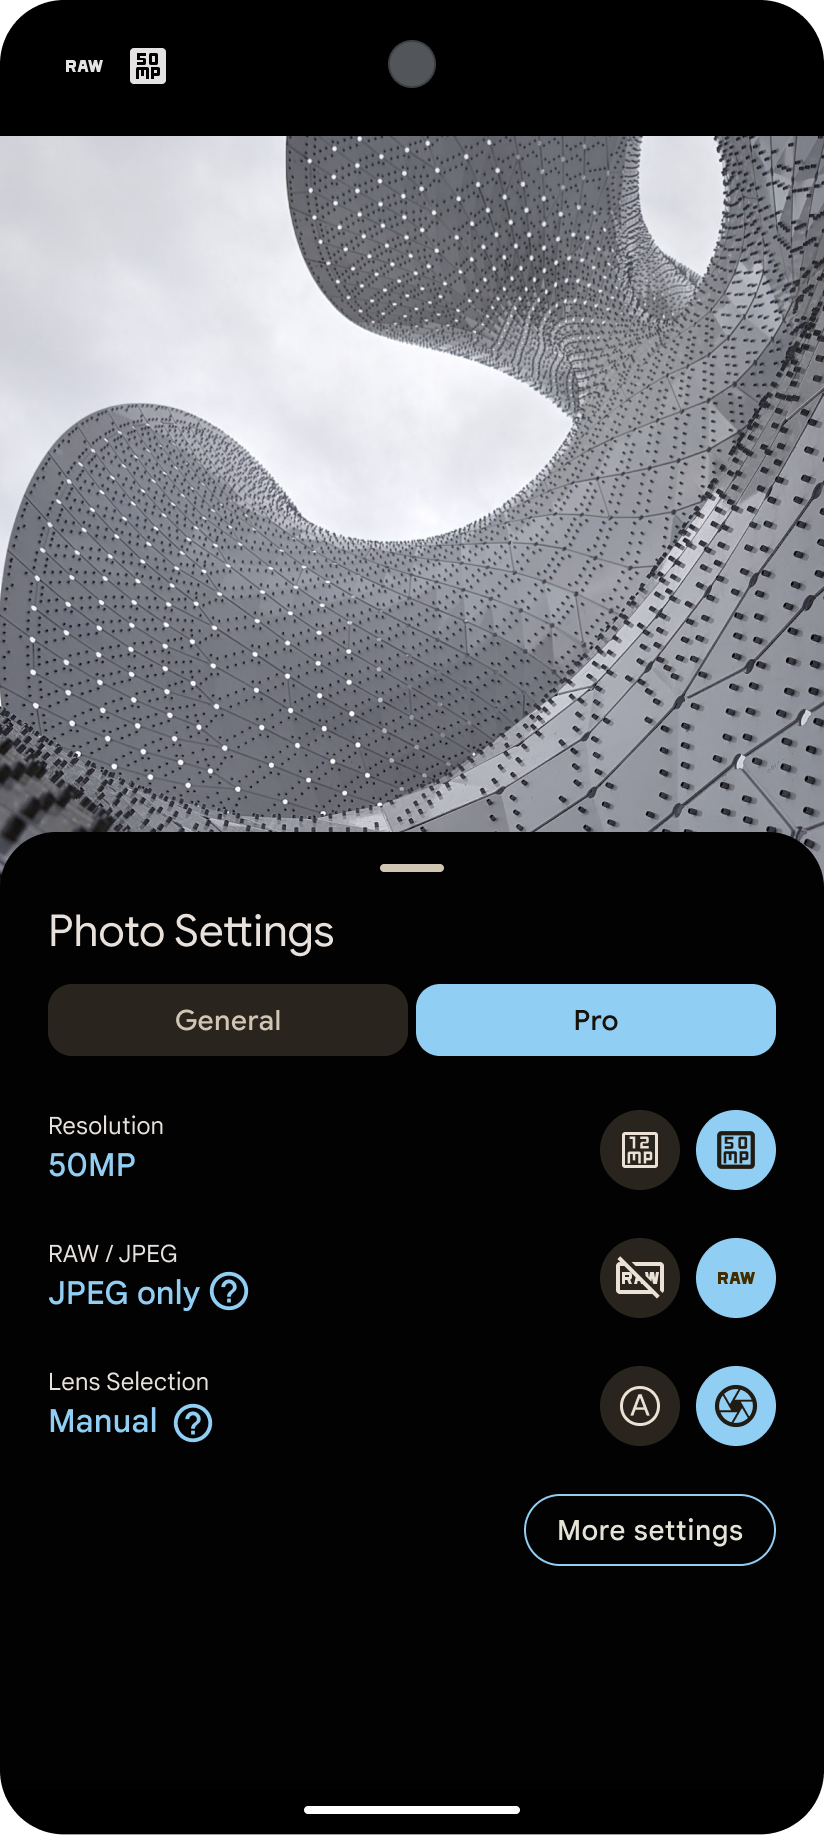

You can access Pro Settings (50MP, RAW, Manual Lens selection) by tapping the Settings icon in the lower left hand corner and then going to the Pro tab. You can access Pro Controls (Focus, Shutter Speed, and ISO) by tapping the Controls icon in the lower right hand corner. This will show Pro Controls and more at the bottom of the screen.
Get to know the big three: focus control, shutter speed, ISO
Alex says there are three settings in particular you might want to first familiarize yourself with: focus control, shutter speed and ISO. “Focus control gives you the creative ability to adjust what’s in focus,” he explains. "Sometimes you may want to focus on parts of an image that aren't directly in the center of the frame.” Then there’s shutter speed, which — as you can likely guess — determines how long the camera sensor is capturing light. “If you set a faster shutter speed, you’ll get an effect that looks like you’re freezing motion,” Alex says. And if you set a longer shutter speed, you’ll see the motion sort of blurred. “You’ve probably seen photos taken of traffic at night where you get light trails — that’s taken with a slower or longer shutter speed.”
So focus control controls focus, and shutter speed lets you adjust — that’s right — the shutter speed. Pretty straightforward! What about ISO? ISO stands for International Organization of Standards (which, yes, should be IOS, but it’s a long story), and as it relates to your phone camera, ISO is simply the setting that determines how sensitive a camera’s sensor is to light. “An easy way to think about it is if you use a higher ISO, the sensor is more sensitive to light and as a result you'll get more noise or grain in the photo," Alex explains. "A lower ISO means the sensor is less sensitive to light, which results in less noise. Lower ISO works well when there’s bright light or you’re using a longer shutter speed." And if you opt for a lower ISO and a long shutter speed in order to capture more light, it's a good idea to use a tripod or stabilize your phone so the image isn't blurry.
Use RAW if you want to experiment with photo editing
The Pixel automatically shoots images and turns them into JPEG files, but in Pro Controls you can opt for it to turn them into RAW files, which are less compressed files that save more data than a JPEG. If you plan on playing around with your photos in editing, you should try shooting in RAW. “It gives you a lot more flexibility in the editing stage to do things like adjust white balance, dynamic range, or noise reduction. The information stored in JPEG is more limited, which also limits the types of editing and adjustments you can do,” Alex says.
Opt for full resolution for images you might want to print
With the Pixel 8 Pro you have the option to shoot in full, or 50 megapixel, resolution. “Full resolution basically means the camera is using every pixel in the sensor and saving that data,” Alex explains. “If you zoom in or crop the photo later, the details are preserved a lot better and will be much more sharp,” Alex says. “Imagine you take a photo out your window down the street: If you used full resolution, you’d be able to zoom in and the street signs would still be clear and readable.” If you didn’t use full resolution, when you zoomed in, the lower resolutions file wouldn't have preserved this level of detail as well and the result would be more pixelated. Shooting in full resolution means you’ll end up with a higher resolution, larger file that is great for cropping and zooming in later or printing large format photos.
Choose your own lens depending on the effect you want
The Pixel camera has an ultrawide lens, a wide lens and a telephoto lens. The default behavior for Pixel is, as you zoom in and out, the camera automatically switches which camera it uses. “There are a bunch of different signals that are optimized to get you the best image possible,” Alex says. “But you might want to choose the specific camera yourself.” On Pixel 8 Pro, you can switch on manual lens control, and then on the camera viewfinder, you’ll see toggles for each lens. “Think of a DSLR camera where the photographer has their own prime lenses and takes one off to switch it with one that has a different focal length,” Alex says. “It’s kind of like that.” Just without all the extra work.