6 Pixel 9 Pro photo features I’ve used on hiking trips

General summary
The Pixel 9 Pro's camera features made my hiking trips even more memorable. With Add Me, I could easily take group shots without missing out. Magic Editor's Auto Frame helped me capture the vastness of the landscapes, while Zoom Enhance let me zoom in without losing sharpness. Pro Controls and 50MP allowed me to create high-resolution images for printing. Reimagine helped me enhance photos that didn't quite capture the moment as I remembered it. And Night Sight plus Panorama Mode enabled me to take stunning low-light and wide-angle shots of sunsets and starry skies. Time to start planning next summer's adventures with my Pixel!
Summaries were generated by Google AI. Generative AI is experimental.Bullet points
6 Pixel 9 Pro photo features for hiking trips
- Add Me: Easily insert yourself into group shots without a tripod.
- Magic Editor's Auto Frame: Reframe and expand photos to capture the vastness of landscapes.
- Zoom Enhance: Zoom in and crop without losing sharpness.
- Pro Controls and 50MP: Shoot high-resolution images for large prints.
- Reimagine: Replace objects or change the background in photos.
- Night Sight plus Panorama Mode: Capture stunning low-light panoramas of sunsets and starry skies.
Basic explainer
Molly went on hiking trips and took lots of photos with her Pixel 9 Pro camera.
She used cool features like "Add Me" to get in group shots, "Magic Editor's Auto Frame" to fix framing, and "Zoom Enhance" to make faraway things look closer.
She also used "Pro Controls" to take high-quality photos for printing, "Reimagine" to change parts of photos, and "Night Sight plus Panorama Mode" to capture beautiful night and wide views.
Now she's excited to print her favorite photos and plan her next summer adventures with her Pixel.
Summaries were generated by Google AI. Generative AI is experimental.Haiku-ish
Pixel's Add Me feature
Snaps group shots with ease,
No more timer woes.
Magic Editor's frame
Reframes and expands views,
Perfect composition.
Zoom Enhance sharpens
Details after the shot,
No graininess here.
Explore other styles:

My summer is coming to an end, which means I’m wrapping up my hiking and backpacking trips. But I’m happy to report that I got out on the trail multiple times, enough to tide me over for a couple months at least! Better yet, I took my new Pixel 9 Pro with me and captured plenty of photos of my outdoor adventures. Here are six features I used to take some of my favorite photos from this summer’s trail trips.
1. Add Me
Add Me was — without a doubt — the most useful Pixel Camera feature for all of these trips. During group adventures of the past, if no one was around to take our photo we’d struggle to position a phone against a tree or a rock, hit the timer and hope to make it into the group shot before it went off. This summer, I would simply snap a pic of my friends and then hand the phone off to a friend, join the scene myself to get an excellent photo of us all.
2. Magic Editor’s Auto Frame
Plenty of times, I find that my trail photos don’t do the actual vastness of the landscape justice, or that I just missed the perfect framing because I was distracted or moving too fast. Magic Editor’s Auto Frame tool is perfect for a few of these images: It uses AI to analyze the layout of a photo you took and reframe the subject as well as expand its borders. It even shows you composition options so you can pick one you like best.
3. Zoom Enhance
Super Res Zoom on Pixel Camera is one of my favorite features for landscape photos; it allows me to zoom in on the details of something far away and still get a sharp image. But sometimes only when I’m looking through my photos later do I wish I’d zoomed in more — thankfully, the new Zoom Enhance feature allows me to do this after I’ve taken a photo. This tool allows me to zoom in and crop an image, and it will intelligently fill in details, making the subject appear sharper and clearer — no graininess in sight. This is different from simply cropping a photo, which often results in a loss of quality.
4. Pro Controls and 50MP
I like some of the photos I take on these trips so much that I want to turn them into canvases or blown-up printed pieces that I can display — which is why I use Pixel Pro Controls to shoot in 50MP at least part of the time. Shooting in 50MP captures higher resolution images, resulting in more fine details that are important for large prints to look good. I also enable RAW, which makes the photo easier to edit later if I want. When you shoot in RAW on Pixel, it will take one regular, JPEG version and one RAW version. If you decide you don’t need that RAW version for editing but still like the photo, you can keep the JPEG, which is a smaller file size. (Plus it’s also fun to see the difference between the fully processed JPG and the RAW image.)
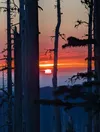
I thought this might make a nice print, so I shot this photo of a sunrise in 50MP.
5. Reimagine
Photos from my excursions don’t always turn out how I remembered the moment. Sometimes what I’d thought was an incredible sunset is more muted than it’d seemed, or I forgot entirely to take a photo of a really beautiful meadow. Here, I thought I’d taken a photo farther down the river where the pine trees were tall and lush — instead, I took one in a more sparse area. Using Magic Editor’s Reimagine feature, I asked the tool to replace the bare trunks with “lush, tall pine trees.”
6. Night Sight plus Panorama Mode
Evening might be my favorite part of a backpacking trip — for one thing, I get some truly excellent sleep after a day of hiking. But I’ll happily put off bedtime to watch the glowing sunsets followed by starry skies. I’ve used Pixel’s Night Sight feature to capture beautiful shots of these dark settings in the past, but now it’s available for panorama shots as well, so I can get an epic, wide field of view that captures the incredible landscape — even in low light.


Speaking of panoramas: Also worth mentioning is the new Panorama Mode, which delivers even higher-quality horizon-spanning images. Its updated UI made it easier than ever to follow along and grab each area of my surroundings, regardless of whether I accidentally tilted the camera — which is pretty easy to do when you’ve got a weekend’s worth of gear on your back.
Now that I’ve got these pictures, all I have to do is get my favorites printed — and start thinking about where I’ll take my Pixel next summer.