10 Chromebook features teachers will love
Chromebooks are a popular choice in K-12 schools because they’re collaborative, reliable, accessible and secure. If you’re a teacher who uses Chromebooks (or are considering using one!), there are a handful of tools, features and settings specifically geared toward helping you out in the classroom — from staying organized to making sure your classes run smoothly. Check out these 10 tips to get the most out of teaching with Chromebooks.
- Take recorded lessons to the next level
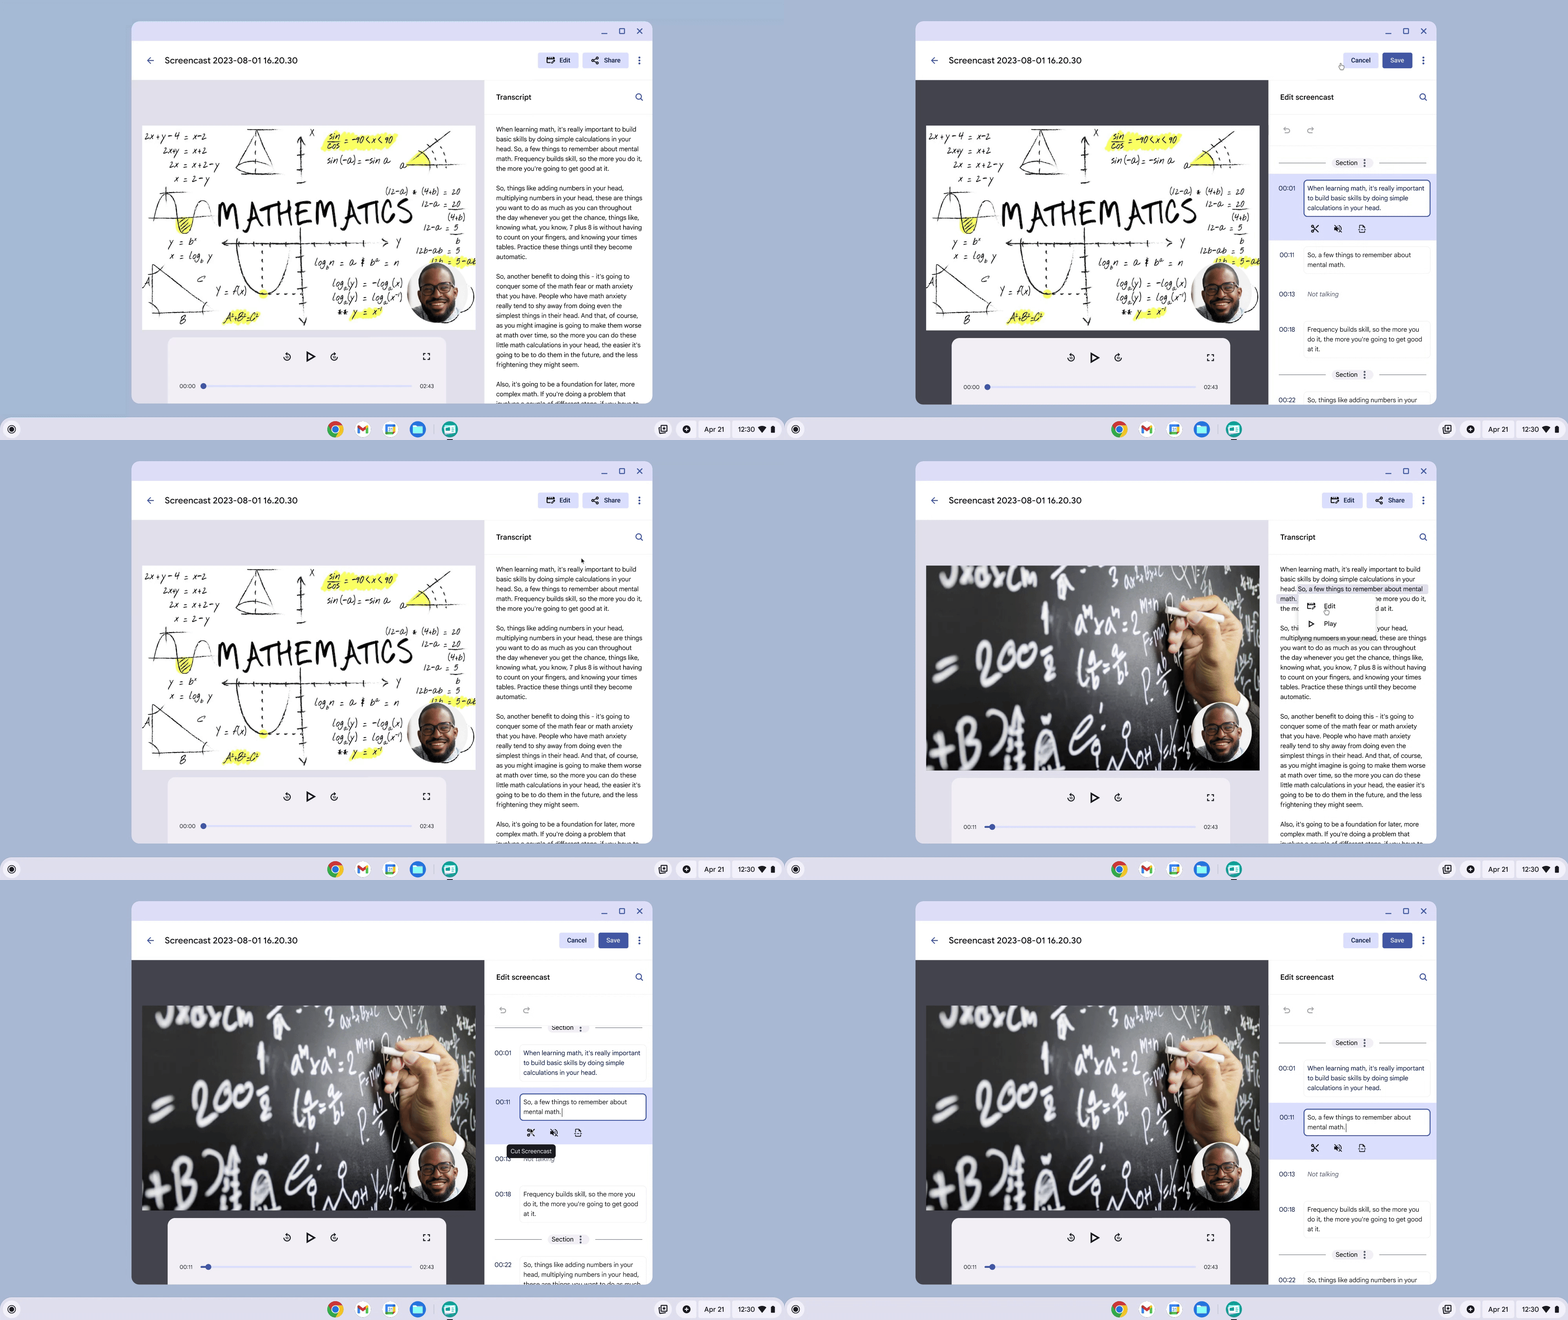
Whether you’re teaching remotely or want to create new instructional content for students, Screencast, an app built into Chromebooks, can help. Screencast lets you record and share video lessons and automatically transcribes your voice so viewers can easily search, navigate and translate your recording via text. You can also edit your screencast by trimming or muting parts of the transcript and break up recordings into navigable sections to make it easier for students to follow. Screencasts are all stored on Google Drive for one-click sharing and quick playback. It’s a great tool for students, too: It makes it easy to create and share video reports or other work without having to use a video editor.
2. Organize work with different virtual desks
If you often find yourself flipping through Chrome tabs or windows trying to locate what you need for class, you’ll want to use the virtual desks tool to separate your workstreams. Think of virtual Desks as folders where you can organize your various projects, or like having individual monitors each dedicated to specific projects or tasks, but all available on one screen. You can organize your desks however is most useful to you — whether it’s a distinct desk for each lesson plan, or different desks for different times of the day or classes (just be sure to rename each desk after you’ve created it so you can easily identify it). To quickly switch from one desk to another, simply swipe with four fingers left or right on the trackpad or hit the show windows key. When you’re done with a task, you can permanently close all the windows in a desk at once or save them to come back to later.
3. Work online and offline
Chromebooks don’t stop when the internet goes down, or if you’re working offline The files app can keep your Drive available offline for whenever you need it. To save a file or folder offline, you can open the FIles App to the specific folder you want to stay synced and flip the “Available offline” switch. Or, if you’re using a Chromebook Plus, you can turn on File Sync to have files & folders automatically saved based on your usage. This way, if the Wi-Fi goes out, the class can go on.
4. Go wireless with cast moderator
Cast moderator is a great tool that allows you to ditch the HDMI cable and allow you to move around the classroom (whether to help students out or keep them on task). Cast moderator lets you use your Chromebook as a wireless whiteboard to cast whatever you’re viewing there to another, larger screen while you move around the room with your device. You can invite students to cast their work as well using a unique access code, so that they can share what they’re working on with the class or in small groups. Best of all? You’re in control and can revoke access to share at any time.
Wirelessly cast from your device or show an access code to invite students to cast

5. Keep track of multiple screenshots
Use the shortcut (or if your Chromebook has it, the Screenshot key) to take a snapshot of your full screen, a region or a window and save it as a screenshot for reference later. You can access your three most recent screenshots in the bottom right-hand corner of your Chromebook or go to your clipboard, which collects your copy history, to reference multiple items once you’re ready to review. While we’re on the subject of multiples: Chromebooks also feature multi-paste, which allows you to access the last five things you’ve copied with a single keyboard click; a pop-up will show the last five things you copied, whether those are links or text.
In Tote, you can pin files that you want to access frequently and easily.

6. Go the handwritten route
Digital tools are an incredible asset for classrooms, but sometimes you might just want to write or draw something on the fly. A wide variety of Chromebooks have touchscreens and are compatible with styluses (some even come built in!), which can be a helpful tool — especially for the more tactile teachers! There are apps built into Chromebooks great for drawing and writing. The Cursive app lets you take handwritten notes; one useful tip while you’re using it is to be sure to lock your canvas — the area you’re writing or drawing on — so if you rest your hand on or swivel the screen at all, your page doesn’t rotate. There’s also the Canvas app, which is similar to the Cursive app but for sketching and drawing.

7. Save, edit and sign PDFs
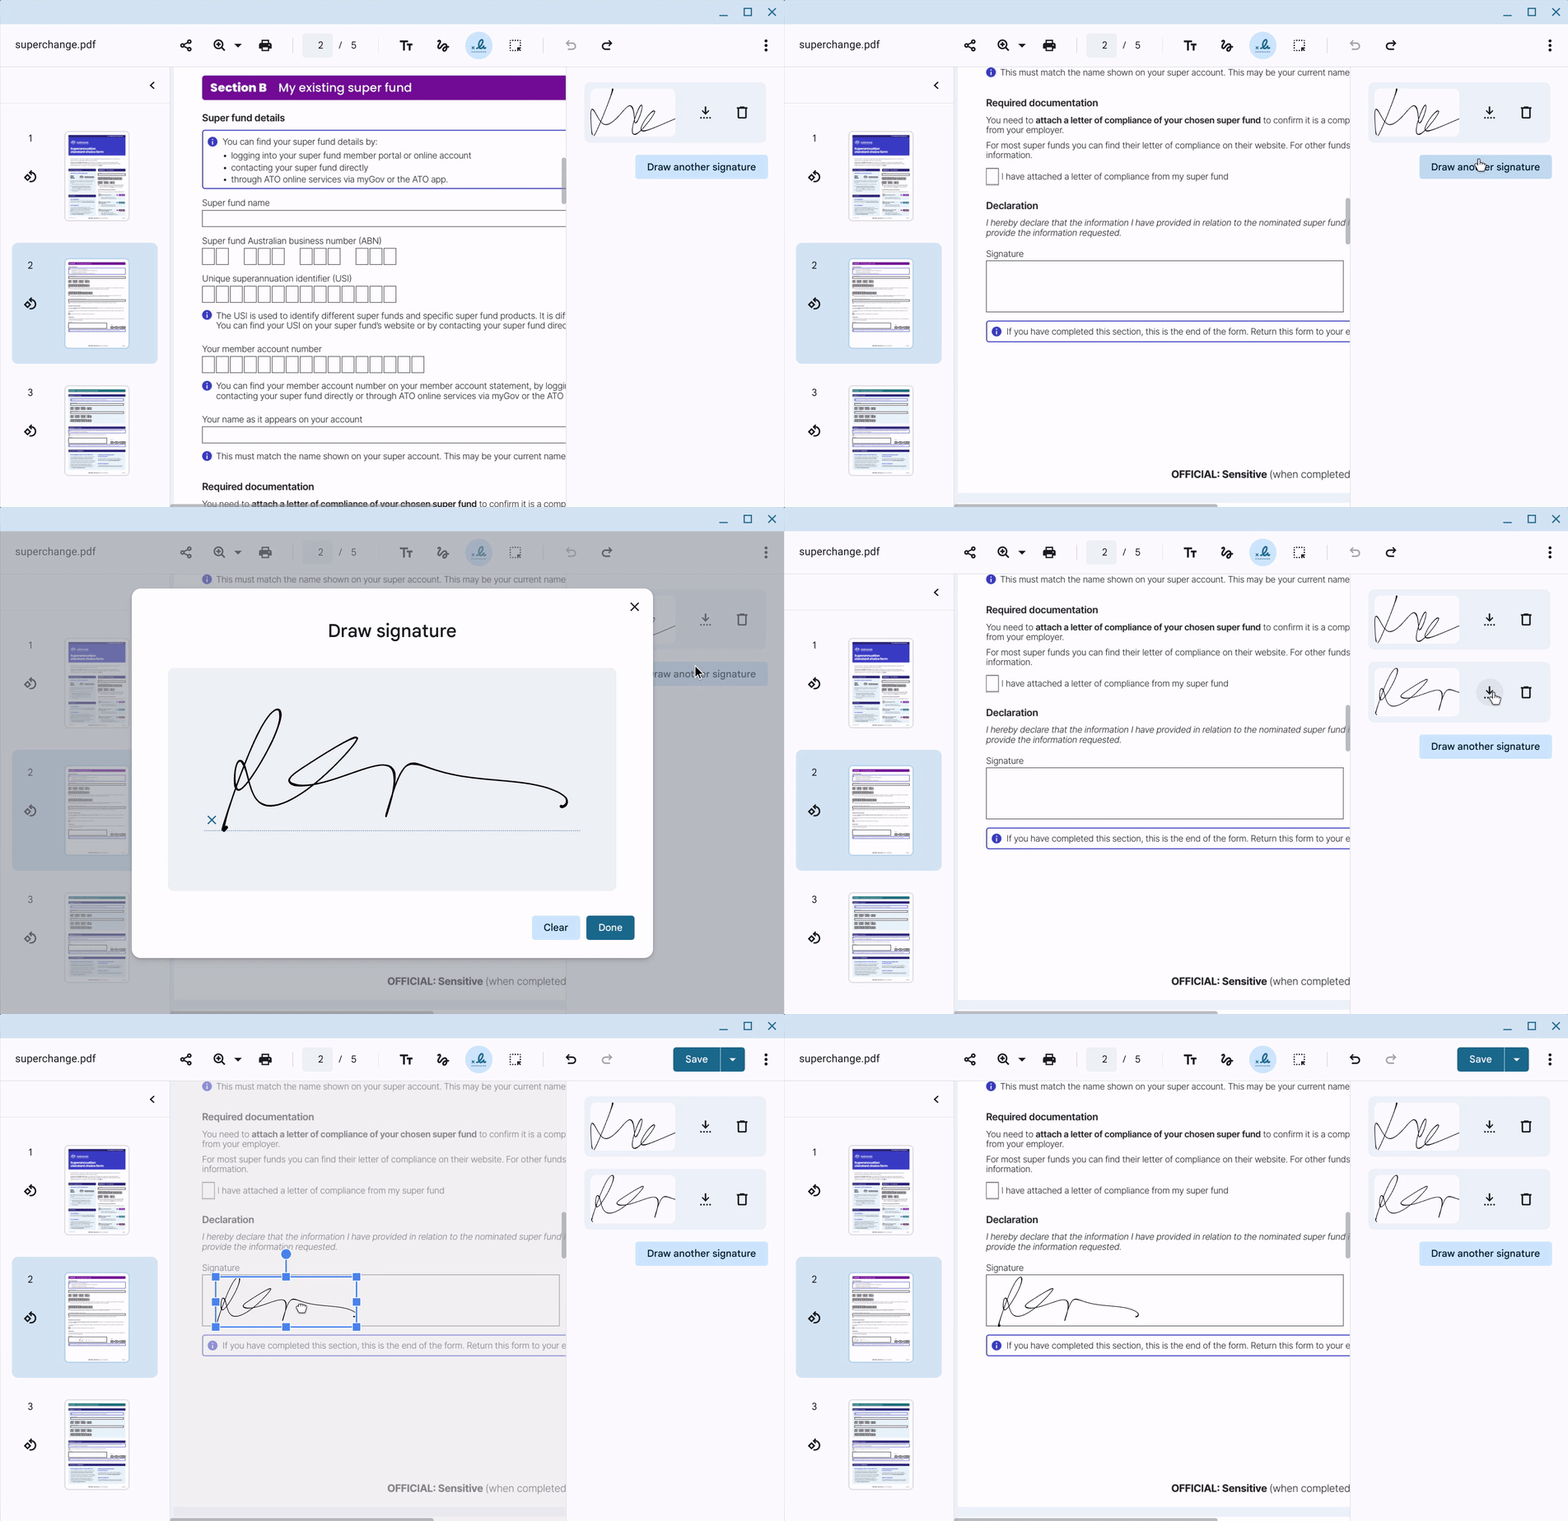
Have lots of paper worksheets and no way to digitize? The Camera and Gallery apps on Chromebook are great for scanning and annotating PDFs, no scanner needed. The Camera app even automatically crops and converts photos of things like paper worksheets into PDFs so they can be shared via Google Classroom. Teachers and students can also download and draw or write on PDFs directly from their Chromebooks within the Gallery app using touchscreens or styluses.
Using the Gallery app you’ll be able to annotate, highlight, edit and sign PDFs.
8. Don’t forget the Everything Button
With a name like that, how could you? The Everything Button, located on your Chromebook’s keyboard, is a quick and handy tool for a variety of functions. A few that can help teachers are things like navigating between open files, switching to your external monitor, or looking through your recently used apps and files. You can also take advantage of the power of Google search from this tool to search your files, images, apps, and more. Hit the Everything Button and you’ll be able to find these actions and more without any digging.
9. Pin your most-used websites and apps
Many teachers do most of their work these days in powerful web apps. You can install and pin these apps to the shelf on your Chromebook for quick one-click access and easy ALT+TAB window swapping. Speaking of apps, you can find tons of great apps that connect with Google Workspace for Education and work on Chromebooks on the Google for Education App Hub.
10. Customize your experience with quick settings
You can use Chromebook’s quick settings to gain fast access to built in accessibility tools and more. Quick settings are found when you click the time on the panel on the lower right-hand corner of your screen. If you click this and then select “Device,” you’ll see the option to show accessibility options in the quick settings panel, so you can make use of things like Voice Dictation and Select-to-Speak without having to find them. You can also add other features to quick settings, like Do Not Disturb (helpful for teaching) or the ability to adjust brightness.

