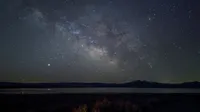
Capture the night sky this Milky Way season

On a clear, dark night, you can see a faint glowing band of billions of distant stars across the sky: the Milky Way. Parts of it are visible on moonless nights throughout the year, but the brightest and most photogenic region, near the constellation Sagittarius, appears above the horizon from spring to early fall.
A few weeks ago, Sagittarius returned to the early morning sky, rising in the east just before dawn—and now is the perfect time to photograph it. Thanks to the astrophotography features in Night Sight on Pixel 4, 3a and 3, you can capture it with your phone.
Before you head outside to catch the Milky Way, here are a few tips and tricks for taking breathtaking night time photos of your own.
Get out of town, and into the wilderness
The Milky Way isn’t very bright, so seeing and photographing it requires a dark night. Moonlight and light pollution from nearby cities tend to obscure it.
To observe the brightest part of the Milky Way during spring, try to find a location with no large city to the east, and pick a night where the moon isn’t visible in the early morning hours. The nights between the new moon and about three days before the next full moon are ideal. For early 2020, this includes today (March 4) through March 6, March 24 through April 4 and April 22 through May 4. Look for the Milky Way in the hour before the first light of dawn. Of course you’ll want to check the weather forecast to make sure that the stars won’t be hidden by clouds.
Do your research
You can utilize tools to help track the rise and set of the sun and moon that will help you find the best time for your photo shoot. A light pollution map helps you find places to capture the best shot, and star charts can help you find constellations and other interesting celestial objects (like the Andromeda Galaxy) so you know what you’re shooting.
Stay steady and settle in
Once you’ve found the perfect spot, open the Camera App on Pixel and switch to Night Sight, and either mount the phone on a tripod, or support it on a rock or anything else that won’t move. Whatever you do, don’t try to steady the phone with your hands. Once stable, your phone will display “Astrophotography on” in the viewfinder to confirm it will use long exposures to capture your photo (up to four minutes total on Pixel 4, or one minute on Pixel 3 and 3a, depending on how dark the environment is).
Get comfortable with the camera features
To ensure you get great photos, explore all of the different options available in the Camera App. Say, for example, you are in the middle of taking a picture, and a car’s headlights are about to appear in the frame; you can tap the shutter button to stop the exposure and keep the lights from ruining your shot. You will get a photo even if you stop early, but letting the exposure run to completion will produce a clearer image.
The viewfinder in the Google Camera App works at full moon light levels, but in even darker environments the on-screen image may become too dim and grainy to be useful. Try this quick fix: Point the phone in what you think is the right direction, then tap the shutter button. Soon after the exposure begins, the viewfinder will show a much clearer image than before, and that image will be updated every few seconds. This allows you to check and correct which way the phone is pointing. Wait for the next update to see the effect of your corrections. Once you’re satisfied with the composition, tap the shutter button a second time to stop the exposure. Then tap the shutter button once more to start a new exposure, and let it run to completion without touching the phone.
The phone will try to focus automatically, but autofocus can fail in extremely dark scenes. For landscape shots you may just want to set focus to “far” by tapping the down arrow next to the viewfinder to access the focus options. This will make sure that anything further away than about 15 feet will be sharp.
Venus above the Pacific Ocean about one hour after sunset at Point Reyes National Seashore in California, captured on Pixel 4.

Use moonlight and twilight to your advantage
Astrophotography mode isn’t only for taking pictures when it’s completely dark outside. It also takes impressive photos during nights with bright moonlight, or at dusk, when daylight is almost gone and the first stars have become visible.
No matter what time of day it is, spend a little extra time experimenting with the Google Camera App to find out what’s possible, and your photos will look great.
Aurora borealis near Kolari, Finland, on a night in February. Photo by Ingemar Eriksson, captured on Pixel 4.


